Storing Comic Books and other Paper Collectibles

How to Store Comic Books and Other Paper Collectibles: Moisture Bad

We understand just how much your comic book collection means to you—and rightly so! These are your paper treasures. Each one is practically a piece of history and a reflection of your passions. That’s why it’s so essential to store them properly and maintain their value for years to come. 

Don’t know where to start? We’ve got you covered! 

This guide to storing comic books and other paper collectibles is packed with all the tips you need to protect them from the ravages of time. Let’s dive straight in.

7 Proven Tips for Storing Comic Books and Other Paper Collectibles

Whether you resell comic books or collect them for your own pleasure, it’s important to take good care of them. You don’t want to risk expensive or irreparable damage to them, such as broken spines, torn or bent pages, and the worst of all – damage from dampness or water. 

Comic book storage is all about careful attention, and with the following best practices, you’ll ensure your collection stays in top-notch condition.

Prepare Your Comic Book Collection

First the basics: prep work! Before you even think about tucking your comics away, make sure to handle them with clean, dry hands. You don’t want any oils or dirt sneaking onto those pages.

If you have any toys, stickers, or other inserts hanging out with your comics, now it’s time to gently remove them. They may seem harmless, but over time, they can cause damage, and nobody wants that.

For added support, consider slipping in some acid-free backing boards. These will keep your comics nice and sturdy, preventing any unfortunate bends or creases.

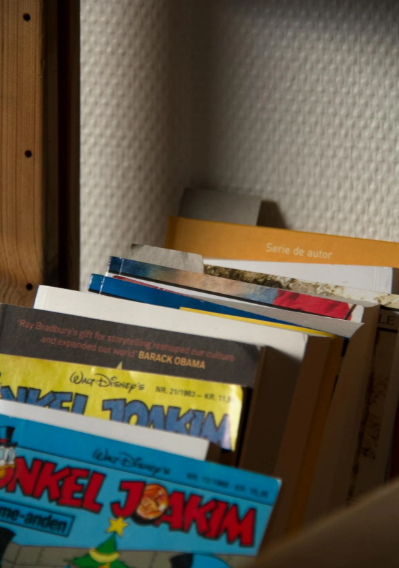
Finally, take a little time to organize. Whether it’s by title, issue number, or genre, having a system makes comic book storage (and finding your favorites later) so much easier.

Choose the Right Comic Book Storage Solution

Now it’s time to think about where your comic books will live. Sure, you could stash them in your attic or basement, but are those really the ideal conditions for your precious collection? Probably not.

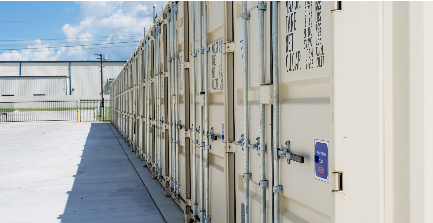
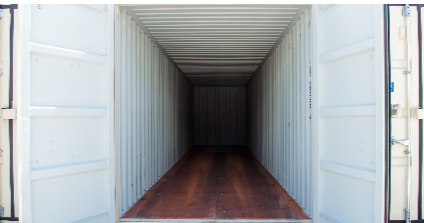
Instead, consider investing in a dedicated space, like a storage unit, designed to keep items safe and sound. The right storage company can make all the difference when it comes to protecting your collection.

Look for a facility that offers waterproof features to protect against any potential water damage. For added peace of mind, choose a company with strong security measures in place. Lastly, find a unit that offers convenient access so you can easily enjoy your paper collectibles whenever you’d like, without any hassle.

Use the Right Materials

Protecting your comic books is also about picking the right materials.

Start with acid-free, lignin-free materials such as archival-quality boxes and bags. These are your best allies in preventing page yellowing and deterioration.

Not all boxes are created equal so make sure you choose the ones that are specifically designed for comic book storage. Look for sturdy covers and handy features like die-cut handles that make moving them around a breeze.

If you like being able to admire your collection without digging through boxes and paper, consider using clear storage bags or boxes. They make it easy to see what’s inside while keeping everything protected.

Also, remember that your comic book storage solution should shield them from dust, direct sunlight, and other environmental factors that could cause damage over time. That’s why this step is so important.

Handle Your Comic Books Properly

Taking care of your comics is just as important as storing them correctly. Always handle your comic books with care, making sure to avoid flexing or creasing the pages. The goal is to preserve the integrity of each issue.

When you handle them, try to avoid touching the comic book’s surface as much as possible. Instead, focus on holding the edges or corners to prevent oils or dirt from getting onto the pages.

For fragile or particularly valuable comics, consider wearing gloves or using a soft cloth when handling them. This will prevent any accidental damage.

Air Out Your Collection

Properly storing your comics also means taking steps to prevent mold and mildew

The best way to do this is by airing out any damp or musty books before placing them in storage. Be sure to check the covers closely and allow for good airflow to help dry out any areas with moisture.

If you find that a book shows signs of mold, it’s crucial not to store it with the rest of the collection. Mold can spread quickly and potentially damage other papers.

Organize Your Comic Book Collection

Another best practice for storing comic books and paper collectibles is organization. There are a few ways to do this.

Consider using display cases or shelves to showcase your favorite comic books. This way you can admire them while keeping them protected. You can also keep your comic book collection organized and tidy by creating a system like we mentioned above, whether by title or genre.

We also suggest regularly inspecting your comic book collection for signs of damage or deterioration. Catching issues early can be a lifesaver for paper collectibles.

Pro Tips for Storing Comic Book Collections

To take your comic book storage to the next level, here are some expert tips to ensure your collection remains in top condition:

  • Store Upright: Keep your comics upright in boxes, just like you would store books on a shelf. This helps prevent bending and warping;
  • Consider Mylar Bags: You can store valuable or fragile comics in Mylar bags. They offer superior protection and help keep your comics looking as good as new;
  • Avoid Direct Light: Exposure to sunlight can cause comics to fade. Store them in a dark, cool space to avoid any color degradation;
  • Choose the Right Box: Make sure the box you choose is strong enough to handle the weight of your collection. A flimsy box can split under pressure and ruin your collection;
  • Pick the Right Size: The box should be just the right size. If it’s too large, fill the extra space with acid-free tissue to prevent unwanted movement. But don’t pack the comics too tightly and leave space for easy removal and replacement.

These tips are the final piece of the puzzle, ensuring your comic book storage is done like a pro. You’ll rest easy knowing your collection is safely tucked away.

Comic Book Storage at My Storage Box

Storing your comic books doesn’t have to be complicated or time-consuming. It’s all about being a little thoughtful and giving your collection the care it deserves—and trust us, it’s worth it. After all, your comics are special, and protecting them is an investment in their long-term value.

And remember, you don’t have to store them at home. We can store them for you! 

At My Storage Box, we provide secure, waterproof storage units that offer 24/7 access, gated entry, and video surveillance. Plus, our clean, well-maintained environment ensures your collectibles stay in pristine condition.

Have questions or want to learn more? Give us a call at (580) 300-3006—we’re here to help!

How to Use Self-Storage for Staging Your Home to Sell Effectively

Use Self-Storage to Help StageYour Home!

You’d be surprised at how much of a difference first impressions make when selling a home! One of the best ways to create that “love-at-first-sight” moment for potential buyers is through home staging. 

Home staging is about making the space feel desirable so that buyers can easily imagine themselves living there. And a key tool in this process is using a self-storage unit.

Self-storage allows you to clean out clutter, store personal items, and remove excess furniture, all of which allow the space to shine and make it easier for buyers to fall in love with the property.

If you’re in the process of selling your home and you want to increase your chances of a quick sale, you’re already on the right track by reading this article. 

We’re here to help you understand home staging better and how you use self-storage to do it right. Let’s dive in.

Why Home Staging Matters

Home staging is the process of preparing a property to appeal to the widest possible pool of buyers. It involves redecorating, rearranging furniture, deep cleaning, and sometimes even decluttering. 

The goal is to make your home as appealing as possible to potential buyers, so they can immediately see themselves living there.

Now, we’re sure your home is already beautiful as is. But here’s the thing: home staging is not about what you like. Your home is YOUR home, but when it’s on the market, it needs to feel like a place anyone could picture themselves calling home.

They need to be able to imagine their life unfolding within those walls. That means your personal touches, while meaningful to you, might not have the universal appeal that helps others connect with the space.

The reality is that buyers are more likely to fall in love with a property that feels spacious, light-filled, and well-maintained. Yes, that means no clutter and no things lying around the living room…

And let’s not forget; in a competitive market, staging can be the best way to get top dollar for your home.

How Self Storage Helps With Home Staging

Self-storage is a powerful tool for setting yourself up for success with home staging. It’s a small investment that can yield big results when it comes to impressing potential homebuyers and securing a great offer. Here’s how it can make a difference:

  • Declutter Without Stress: Clear out unnecessary items without the hassle of finding space at home, creating a calm and inviting atmosphere for buyers;
  • Store Personal Items for a Neutral Look: Remove personal mementos to create a neutral environment where buyers can envision themselves living;
  • Make Rooms Look Bigger: Open up cramped spaces by temporarily removing bulky furniture or items, making it feel spacious and functional;
  • Organize and Streamline Storage Areas: Tidy up closets, basements, and garages to show how much your house offers in terms of ample storage space;
  • Keep Your Home Show Ready: Stay prepared for showings at a moment’s notice by using self-storage to quickly stash away anything that’s out of place.

Ultimately, a storage unit lets you focus on the important task of staging and selling your home without worrying about where to store your belongings or if they’re safe.

Key Steps for Using Self Storage for Staging

To make the most out of self-storage and ensure your home staging is as effective as possible, follow these key steps:

Plan Ahead and Assess What Needs to Go

First, take a good look around your home and decide what can stay and what should be removed. Keep your goal in mind: creating a clean universally beautiful space. This means putting away your collection of family photos, that quirky painting you found on your vacation, bold decor choices, or anything that makes the place feel cluttered or overly personalized.

Make a list of everything that should be stored away and that can go into a storage unit. When placing them, think strategically. Organize them in a way that makes it easy to retrieve anything you might need later. Use sturdy boxes, label everything clearly, and store frequently accessed items near the front. If you’re storing furniture, consider using protective covers to prevent dust or scratches. Stack heavier items on the bottom and lighter ones on top to avoid damage.

Then, you can proceed to the next step of staging your home so that you can sell it for top dollar.

Prepare Your Home for Staging

Before you start staging, your house needs to be spotless. This step involves a deep clean (yes, those neglected corners, too), any minor repair you’ve been putting off, and of course, decluttering. 

Make necessary minor repairs such as fixing leaky faucets, touching up paint, and replacing outdated light fixtures. Declutter and depersonalize every room as much as you can to create a neutral but welcoming space.

If the process feels overwhelming, consider hiring a professional home stager for expert guidance. Do your best, and you’ll reap the benefits later when you have a quick and profitable sale on your house.

Stage With Purpose

Now comes the fun part—time to make your home shine and create that all-important “wow” factor! Staging with purpose means transforming each space to highlight its best features while making buyers feel at home the moment they step inside.

Since the goal is to help potential homebuyers envision themselves living there, focus on creating a warm, inviting atmosphere, especially in key areas like the living room and kitchen. These are the heart and soul of the home, where people gather, so you want to make them look functional but also stylish and spacious.

When it comes to the bedrooms, think warm and cozy. The right lighting, soft bedding, and a neutral color palette, can make the room look ideal for a restful night’s sleep. 

Additionally, consider staging the outdoor spaces, such as the patio or backyard, to make the home feel even more inviting.

Stage Your Home for Listing Photos

Your listing photos are the very first impression buyers will have of your home, so make them count. Aim for high-quality, well-lit photos. Capture your home from the right angles to highlight its space and features. And don’t hesitate to ask your realtors for assistance with real estate staging if needed. Sometimes professional stagers can help bring your vision to life and ensure your home looks its absolute best.

Before taking photos, make sure the home is clean and clutter-free. Even the most beautifully staged home can lose its appeal if there’s a visible mess all around. 

Use your self-storage unit to tuck away anything that doesn’t contribute to the overall aesthetics. Keep only the essentials in place to create a clean, open, and inviting space.

Avoid Common Mistakes in Home Staging

Home staging is simple but still some mistakes can happen when you’re doing it for the first time. To keep things running smoothly, be mindful of these common staging mistakes:

  • Less is more when it comes to decor. Over-accessorizing can make a space feel cramped and distracting;
  • Bright, bold colors might seem fun but they can be off-putting to some buyers. Stick to neutral colors that let the space speak for itself;
  • And please, keep the house clean and clutter-free before showings. Nothing says “this place is loved” like a well-maintained space;
  • Pro tip: Avoid using self-storage to store items that are essential to the staging process such as furniture that defines a room’s function, tasteful decor that enhances the space, or anything that makes the house feel warm.

Choose the Right Self Storage

Alright, we’ve reached the final step: choosing the right storage unit. It’s time to take that inventory list you’ve carefully made and find a place that works for both your stuff and your budget. 

You want a unit that fits everything comfortably, without being cramped or unnecessarily spacious. So, pick a unit size that makes sense for your needs. Too small, and you’ll run out of space. Too big, and you’ll pay extra money for space you don’t need. If you’re storing anything valuable, go for waterproof facilities to keep them safe. Remember that security is vital, so look for facilities with 24/7 surveillance and gated access.

To make things easier for yourself, choose a facility in a convenient location that’s close to your home. This will make dropping things off and picking up much simpler.

And when it comes to access, make sure it’s a facility where getting to your unit is hassle-free. No one wants to deal with parking and lugging things all over the place, right?

Ready to Rent a Storage Unit?

Now that you know how essential self-storage can be for home staging, it’s time to make it happen. It’s all about working with what you have in your house to present it in the best possible light. By thoughtfully arranging furniture, decluttering, and using self-storage to remove distraction, you’ll create a space that feels bigger, brighter, and more inviting.

Shipping containers lined up for use.

If you’re on the hunt for self-storage units in Ponca City, OK, My Storage Box is here to make life easier for you.

We offer affordable, secure, and easily accessible storage units to help you achieve the perfect staging setup. Our facility is fully fenced, gated, and features keypad access, so you can come and go with peace of mind, knowing your belongings are safe.

Have questions or ready to get started? We’re available 24/7, every day of the week. Reach out anytime, and we’d be happy to help you find the perfect storage solution!

Top Tips to Combat Mold in Self Storage and Protect Your Belongings

Effective Strategies for Managing Mold in Self Storage 

Mold is a scourge. We all know it is destructive, costly, and most of all, disgusting. How can you effectively control mold?

The most important part of mold control is moisture control. This is why super dry areas like Colorado and Arizona have fewer struggles with mold while the Southeast and even major swaths of the Midwest and Great Plains do not. Relative humidity plays a big factor in mold propagation. Here are a few of the ways we suggest to remediate mold problems in self-storage.     

Is Mold Common in Storage Units?

The presence of mold in storage units is not common, but often occurs. If you do an easy internet search then you will notice that returning to a storage room only to find belongings covered with mold is an unpleasant experience for everyone. And let me tell you what: Northern Oklahoma and Southern Kansas are no strangers to humidity. Even though we aren’t anywhere all that close to palm trees and citrus orchards, our climate here is humid subtropical and if you’ve spent any time hanging out around here in the summer, you are well aware of the humidity here. 

“It’s not the heat; it’s the humidity” comes to mind. 

Mold can happen anywhere in this part of the country when things get sultry and muggy. If your items are not in a climate controlled storage unit, you’ll want to make sure that you visit the storage unit regularly to check on any items that are sensitive to humidity and moisture. 

Make sure items are completely dry before storing

The first thing you need to do is take an assessment of what you have in storage. Are there things that are particularly sensitive to moisture and mold? How do you have them packed if you do?

While it does get pretty sticky here in Northern Oklahoma (okay, that’s an understatement), it is usually not so oppressive that beads of condensation well up on items in storage. If you put items away in there that are dry to begin with and are in storage solutions that help keep things dry (tubs, airtight bags, etc.), they won’t get wet in storage.

Clean Before Storing

Mold can be effectively combated by keeping stuff clean, and again, keeping it really dry. If you master the issue of moisture, you will mostly master mold. First off, for anything that is susceptible to mold, make sure you take it out of packaging that can easily host mold. Don’t pack it in cardboard with paper packing. Instead, opt for plastic containers. 

Take out everything and put it in a storage container. All the surfaces are cleaned with proper disinfecting chemicals. Home cleaning products work, but commercial antimicrobial spraying can help protect against mold.

Again, make sure to use common sense. Go check on your belongings often, and most of this only applies if you are using storage that is not climate controlled. A climate controlled unit should eliminate most issues that grow mold spores, and there are some circumstances where you should consider climate controlled storage units, namely if you have a lot of items that are sensitive to extreme temperature swings and high humidity, both of which occur in these parts. 

Understanding Mold Growth in Storage Units

Mold spores can rapidly multiply in storage units, causing significant damage to stored items and posing health risks. Excess moisture is the primary culprit for mold growth in these environments. Understanding the conditions that foster mold growth is crucial for preventing it. 

Regularly inspecting storage units for signs of mold growth can help prevent infestations. Mold growth can be effectively prevented by controlling humidity levels and ensuring good ventilation in storage units.

Also, if you have items in storage containers like plastic tubs, you can inhibit mold growth by using desiccants such as silica or montmorillonite clay. Montmorillonite clay is naturally occurring so it might be more preferable to those wanting a natural solution. 

Choosing the Right Storage Space

When selecting a storage space, opt for a climate-controlled storage unit to maintain consistent temperature and humidity levels. It’s essential to consider the storage facility’s humidity levels and ensure they are suitable for your stored items. Look for a storage facility with a good reputation and a secure, pest-free environment. Before storing your items, check the storage unit’s condition and ensure it is clean and dry. 

One thing about our shipping containers is that they are made to be water-tight. This is great at keeping moisture out, but it can also occasionally lock it in. Make sure you are using desiccants when and where needed. 

Preparing Items for Storage

Proper preparation of items for storage is important to prevent mold. Clean and dry items thoroughly before storing them to avoid moisture buildup and mold growth. Moisture is obviously your enemy, but you still want them to be completely clean. 

Use plastic or metal containers instead of cardboard boxes directly on the ground. Thankfully, our shipping containers provide a barrier against this by having not only four walls, but a solid steel floor.  

Packing desiccants in storage containers can absorb residual moisture and prevent mold growth. I personally use desiccant clay which is a non-toxic option, but silicon gel works great.  Treat leather goods with specialized cleaning products and conditioners to prevent mold growth. Additionally, clean hard surfaces with bleach and water to kill mold spores and prevent their growth. 

Finally, check out the storage unit itself. If it is already showing signs of moisture retention when it is empty, don’t rent it! 

Preventing Mold Growth

To prevent mold growth, keep your belongings off the floors to protect them from mold and moisture. Use shelves or wooden pallets to elevate your items and prevent condensation. Investing in proper packing with waterproof boxes or silica gel can further prevent mold growth. 

Regularly check your storage unit for signs of mold growth and address any issues promptly. I know it’s easy to forget about your storage unit; I’ve got one for vintage furniture and sometimes forget about it! Since storage units rarely come equipped with electrical outlets, using a dehumidifier isn’t really an option, but again, if you are that worried about it you might consider a climate controlled unit. 

All in all, if you keep your stuff dry and clean, you don’t have much to worry about.

Best Practices for Storage Unit Maintenance

Again, you need to regularly inspect your storage unit for signs of mold growth and addressing any issues promptly is key to maintenance. Or better yet, keep tabs on it and make sure there isn’t anything in there that could  Keeping your storage unit clean and dry is crucial to prevent mold growth. Use a vapor barrier to block outdoor moisture and prevent mold growth, and regularly monitor your storage unit’s humidity levels Again using a dehumidifier is probably not an option so you need to put your stuff away dry and keep it dry. 

I have had great success using vacuum-packing bags where you remove as much air as possible with a vacuum cleaner. These do a great job of keeping out moisture and keeping things dry, with the added benefit of condensing soft items like clothes. You can pack a bunch of clothes into vacuum pack bags and then stuff those bags into tubs with an added layer of protection. 

Parting Thoughts

Preventing mold in a non-climate controlled storage unit is a blend of passive and active measure. You need to make sure everything is clean and dry going in, and the more vapor barrier you have between your items and the elements, the better. Our storage units are water tight and extremely strong, but they are not climate controlled and it gets both very hot and humid and very cold here. 

The goal is to not ever deal with existing mold in storage facilities. Too much humidity in your packed materials will eventually lead to mildew and mold, so humidity control is clutch. Fabric based items should be clean AND dry before going into storage, and control moisture levels as much as possible. Silica gel packets are a great tool for preventing mold and keeping moisture levels low in sealed containers like lock boxes and safes. 

My Storage Box is the premium place to lock your goods up in North-Central Oklahoma, and we are expanding! Keep an eye on our website for future locations! 

Can You Pack for a Move in One Day? Tips to Make It Happen

Can You Really Pack for a Move in One Day? Yes. But You Might Need Help

Most people dread the thought of moving, and the idea of packing up everything in just one day? That seems even worse! But let’s be real, sometimes moving quickly can actually be a good thing! No wasting time on procrastination, overthinking, or getting too sentimental about every item. You pack up, you move, and it’s done.

Sounds a bit unrealistic, but is it really? What if you really could pack everything in just one day and get it over with?

It’s entirely possible with the right approach and techniques. We know that better than anyone else, having worked with many people in between moves and who chose to store their things in our storage units

So we decided to put together this guide with essential tips to pack for a move in one day.

Set Realistic Expectations

As much as you want to stay optimistic about packing and moving quickly, it’s important to be realistic. Don’t put too much pressure on yourself. Take a moment to truly think about whether packing everything in one day is possible for you. The truth is that it’s not always possible for everyone, especially if you’re moving into a bigger space or a new neighborhood, juggling a busy schedule, or dealing with fragile items.

That said, for smaller moves or if you’re super organized, it’s definitely doable! Just take a step back, assess your situation and then plan accordingly.

The Key to Packing in One Day: Planning and Organization

Want to know the real secret to packing up and moving in just one day? It’s all about planning and staying organized

Stick to this checklist for moving home:

  1. Start Early – Give yourself a head start so you’re not scrambling at the last minute.
  2. Declutter – The less you have to pack, the easier it’ll be.
  3. Prioritize – Focus on what matters most and don’t get lost in the details.

A quick and stress-free move doesn’t start on moving day. It starts at least a day before.

Take some time to get things in order so that you’re not running from location to location like crazy when moving day arrives. 

Use this packing for a move checklist:

  • Get your boxes, tape, and bubble wrap in advance so you’re not making emergency runs to the store
  • Jot down must-do tasks like setting up utilities or changing your address
  • Take pictures of how your electronics and furniture are set up before unplugging or disassembling them
  • Pack a “first-night” box with essentials like toiletries, towels, and a change of clothes
  • If you’re drowning in stuff, consider hiring professional movers or renting a storage unit near your neighborhood to alleviate some of the workload

Create Packing Zones

To make packing more efficient and less overwhelming, break your home into packing zones and tackle one area at a time. It’ll help you stay focused and not run around your entire home feeling scattered around.

For instance, you could start with the least-used spaces like attic, basement, or storage closets since the things in there are usually non-essentials. Once those are packed, you can move on to more frequently used rooms like bedrooms, the kitchen, living room. 

This method keeps things organized, prevents unnecessary back-and-forth, and helps you see real progress as you go.

Packing for a Move Tips

As we said above, using the room-by-room packing strategy can help you stay on track and avoid chaos. But this is not the only packing technique to keep things running smoothly. Here are some other packing for move tips to try.

Label everything clearly to save yourself time and frustration later. Clearly label each box with its contents and the room it belongs in as this will save you from rummaging through random boxes later.

Wrap up anything you won’t be using in the days leading up to your move, and pack heavy items like books in smaller boxes while keeping lighter items like clothes in larger ones. For extra convenience, leave clothes on hangers and slip them into trash bags with hooks sticking out. (This makes unpacking so much easier).

Make the most out of your space by stacking items vertically, like plates and bowls, to maximize box capacity and keep fragile items secure.

For an extra level of organization, consider color-coding your boxes by room. A simple trick that makes unpacking a whole lot easier.

Manage Your Time and Priorities

Packing in one day might seem intense, but trust us, with a smart packing for a move timeline, it totally can be done.

Start by creating a simple schedule, breaking the day into chunks with regular breaks to keep yourself from burning out. Focus on important things first, like medications, documents, and anything else you’ll need right away.

Using a timer can also help keep you on track. It helps you move quickly without overthinking what to pack next. 

If possible, call all reinforcements like friends, family members to make the process faster (and maybe even fun). And remember, home moving is stressful so don’t let small hiccups throw you off. Stay patient, take a deep breath when things can be frustrating, and remind yourself that at the end of the day, you’ll be packed and all done.

Use Storage Units to Your Advantage

If you have items you don’t need right now or aren’t sure how to pack, reserve a storage unit to make your life easier during your move. Instead of cluttering your new space with things you’re not ready to unpack, you can keep them safe and out of the way until you’re settled. 

Storage units are especially helpful if you’re downsizing, in between homes, or just need some extra time to figure out a location where everything should go. They give you the flexibility to move at your pace without feeling overwhelmed by too many boxes all at once.

Wrapping Up: Yes, You CAN Pack in One Day!

Packing up your entire home in one day may sound like a wild challenge, but with the right moving homes checklist, it’s absolutely possible! The trick is to stay organized, plan ahead, and keep things moving at a steady pace!

And if you really want to make your life easier, consider using a storage unit near your location. At My Storage Box, we’ve got flexible options that can take some pressure off. Store what you don’t need right away, so your new place isn’t a mess of boxes.

With a little prep, some help, and a bit of space to breathe, you’ll be ready to go in no time! 

Plus, My Storage Box offers 24/7 access, video monitoring, and gated entry to ensure your items are safe. Click the link below to get started, where you can reserve a unit and make monthly payments. You can also call us at (580) 300-3006. Talk to you soon!

Effective Strategies for Your Home Restoration Project Success

Smart Planning for a Successful Home Renovation Project

It may not feel like it at the moment, but Spring is rapidly approaching. In a few weeks, these arctic blasts will largely be forgotten about and people will start ramping up for outdoor projects and home renovations. We have a nice, long warm season here in the Great Plains that starts usually in March/April and stays warm for about six months. But for a big project, it can take the whole warm season to complete a project (or longer). 

If your project involves restoration and/or remodeling of the interior, you might be wondering what in the world you can do with all of your stuff. We suggest a self-storage unit to move household goods into so you don’t worry about drywall dust, sawdust, and just overall dirt and exposure.  

Planning and Preparation

Every project, whether DIY or paying for a contractor, starts with a plan. When you start a renovation project in your home, you always start with a solid plan in place. Work commences on this date, in this room, and moves to here or there, and so on. 

Part of that plan is where to store items from the room while work is being done. My Storage Box has a wide range of storage solutions with temporary storage units in 8×10, 8×20, or 8×40. If you need some help finding the right size, check out our article on the subject. 

Determine the Scope of Your Renovation Project

The renovation process can be from a limited scope of simply patching and painting walls, all the way to tearing out walls and ripping up the whole floor. Home remodeling storage is a good idea to move everything out of the room for the duration of the remodeling project. But before you go getting home renovation storage set up, you need to figure out the scope of the project. If it is just a single bedroom, an 8×10 storage unit is more than enough. 

Every home renovation project is different; some require the entire house be emptied with multiple rooms under construction. Other rooms, like a bathroom with very little furniture, can simply be moved to a basement or garage. 

Create a Storage Plan

Once you know what the project scope entails, you can start planning your renovation storage needs to stay organized throughout the process. You will probably want regular access to your goods while the home remodeling is ongoing, so ease of access and storage security are important. Moving furniture is not all that enjoyable, so make sure your storage plan is correct so you only have to do it once. Keeping stuff clean is really important throughout the process, and self storage is the perfect solution to keep your belongings safe. Small projects, big projects, new floors, etc. 

  • Create a detailed inventory list of the items you need to store. Make sure to annotate anything identifying about them, like which tub they are in or box. 
  • Include furniture, electronics, personal belongings, and any other items that might be at risk of damage during the renovation. 
  • Use the inventory list to help you determine the size and type of storage solution you need.
  • Plan for any additional storage needs that may arise during the renovation.

Protecting Your Belongings

While our storage units are water tight (they are made for ocean-going vessels after all), you will still want to box up your belongings and take care of your furniture. 

Protect Furniture and Fragile Items Inside the Home

Use protective materials, such as moving blankets and furniture covers, to protect your furniture and belongings. Since this is temporary storage, you will be taking them back out of storage once the remodeling project is done. 

Keeping your belongings away from construction areas will prevent damage, so go ahead and line up a self-storage unit for the duration of the project. 

Choosing the Right Storage Solution

Which storage solution is best for you? It depends on what you need to store. If you have a lot of things that are sensitive to environmental conditions, you probably should get climate controlled storage. 

Home storage is the best way to keep your belongings protected when the dust is flying and demo work is pounding away. Large scale projects require large scale solutions.

Storage Unit Options

My Storage Box offers a simple online sign-up and payment processing system so you can rent month-to-month

  • Some self-storage facilities offer climate-controlled storage units, which are essential for storing sensitive items.
  • Consider the location and accessibility of the storage unit when making your decision.
  • Storage units can be used for storing furniture, belongings, and other items during a renovation.

Packing and Storing Items Safely

You have a couple of choices when it is time to renovate the house. Your first choice is to pack everything as well as you can and move it around the house or in the garage to keep your belongings safe during construction. 

Of course, if your household is anything like mine or most other Americans, your house can’t really absorb the household goods, furniture, and so on from a fully-furnished room into the rest of the house. A self storage unit is the best way to deal with remodeling project overflow. Let your home storage be there for other rooms and get all of that additional belongings into an easily accessible unit. 

Pack Items Carefully

Here are a few tips we suggest for making this experience as good as possible. First, if you are putting any valuable items in storage, make sure they are well packaged. There is nothing wrong with doubling-down on security for valuables; you should put things in a lock box that need to be there. 

  • Use high-quality packing materials, such as sturdy boxes, bubble wrap, and packing paper, to protect your belongings.
  • Pack items carefully to prevent damage going to and from storage.
  • Label each box for what’s in the box and what room it goes in (in case you are renovating more than one room). 
  • Place heavier items at the bottom of boxes and lighter, more fragile items on top. You would be surprised how many people don’t understand this. 

Store Items Safely

Home remodels and renovation projects are messy. There is all kinds of stuff going on, demolition, loose hardware, you name it. The best renovation storage is where you can take all of your extra stuff and put it far away from the project. 

Getting Started

My Storage Box is the #1 choice of contractors and DIYers to keep household goods safe and sound during home renovations. Also, we are a great option for contractors to keep tools, materials, and supplies clean, dry, and most importantly, safe between jobs. 

Ready to start the renovation of your dreams? Don’t swing that hammer until you’ve got your household goods in storage. You can rent a unit anytime, day or night, through our automated online system. Also, we rent 10×40 outdoor storage space that works great for contractor box trailers! 

Essential Guide to Moving into First Apartment: Must-Have Checklist

Moving Into Your First Apartment? Here’s Everything You’ll Need

The big day is finally here: You’re moving into your first apartment! 

Soon, you’ll be sitting in your very own living room, kitchen, or bedroom and the reality will sink in: “Wow I really did it. This is my own home.” But before you can truly enjoy that sense of accomplishment, there’s one important thing to take care of: getting all the home essentials you’ll need. 

We’ve put together the ultimate first apartment checklist along with some helpful tips to help you get started. Let’s dive in!

Pre-Move Planning

While this is an exciting step, it can also get expensive especially if you go into it without a plan. The thrill of the moment can quickly take over and lead you into a shopping spree, where you end up buying things you don’t need right away and neglecting the must-haves. 

That’s why it’s crucial to create a budget for both your moving costs and home essentials, and actually stick to it. By being mindful of your spending, you can ensure the process is as enjoyable as the outcome.

Then, to further help you follow the budget, you need to have a comprehensive checklist for your first apartment to ensure you don’t forget anything important. This is where we jump in with our apartment checklist that will help you stay on track and avoid those “oops, I forgot that” moments when you’re unpacking.

Ultimate First Apartment Checklist

Kitchen and Dining Must-Haves

When it comes to stocking your kitchen, it’s all about tailoring your essentials to what your apartment actually offers. For instance, if you don’t have a dishwasher, you’ll need to invest in a solid dish drying rack and some good dish soap.

Maybe some things on the below checklist may seem not that urgent like plates and utensils. And sure, you can get by with paper plates and plastic utensils for a little while, but you’ll want to upgrade to proper plates and utensils soon enough. Consider investing in a basic set of kitchen tools, including a coffee maker and cooking utensils. That flimsy plastic fork just doesn’t cut it when you’re trying to enjoy a delicious home-cooked meal in your first apartment. 

When it comes to bigger items, don’t be afraid to shop second-hand or visit local garage sales. You’d be surprised by what you can find there!

And while you might not need everything the day you move in, it’s a good idea to start thinking about your first grocery run. Start with essentials like olive oil, spices, and canned food.

Now, let’s get into the kitchen and dining essentials for your new apartment: 

  • Aluminum foil
  • Baking tray
  • Blender
  • Bottle and can opener
  • Coffee maker
  • Colander
  • Cooking utensil set
  • Crockpot
  • Cutting boards
  • Dining room table and chairs
  • Dish drying rack
  • Dish soap
  • Dishtowels
  • Drinking glasses
  • Dishwasher pods
  • Food storage containers
  • Knife set with chef’s knife
  • Large and small plates
  • Measuring cups and spoons
  • Mixing bowls
  • Oven mitts
  • Paper plates
  • Paper towels and holder
  • Parchment paper
  • Placemats
  • Plastic or other food wrap
  • Salt and pepper shakers
  • Silverware set
  • Sponges
  • Trash bags
  • Trash can
  • Wine opener
  • Wax or parchment paper
  • Ziploc bags

Bedroom Essentials

After your moving day, you’ll be exhausted so having a comfortable bed to crash on that first night is an absolute must. Out of everything on our checklist, getting your mattress and bedding setup should be a priority. Sure, you can wait a bit on the bed frame, but trust us, the last thing you’ll want to do after hauling boxes all day is sleep on the floor. 

In a new apartment, you deserve a cozy fresh bed and all other bedroom essential to make you feel at home. Here’s what to get:

  • Bed frame
  • Bed pillows
  • Bedspread/Comforter
  • Bedside table
  • Blankets
  • Curtains
  • Desk
  • Desk lamp
  • Dresser
  • Fan
  • Hangers
  • Mattress
  • Mirror
  • Nightstand
  • Pillows
  • Pillowcases
  • Sheets
  • Space heater
  • Trash bin
  • TV Stand
  • Window coverings

Living Room Necessities

Ah, the living room. It might seem like the furniture there is just decorative, but we beg to differ. This is the heart of your new home. It’s where you’ll be unwinding after a long day at work or hanging out with your friends on weekends. A comfortable and functional living room can really tie an apartment together.

We encourage you to make your own checklist for this area, but don’t underestimate the power of the little details. You might not have given much thought to decorative pillows or blankets, but those are exactly the elements that make a home feel warm and inviting. So use the checklist below as you want and remember that it’s the small touches that transform a space into a home.

  • Area rug
  • Chairs/additional seating
  • Coffee table
  • Couch or Sofa
  • End tables
  • Extra lighting
  • Plants
  • Speakers
  • Streaming devices
  • Television
  • Throw blankets
  • Throw pillows
  • TV stand

Bathroom Essentials

The bathroom can be a tricky space to tackle because it’s filled with essential items that are easy to overlook. Things like a shower curtain, extra toilet paper, and cleaning supplies often slip our minds… until you find yourself unable to shower after a long day of moving into your new home. You don’t want that!

Your main focus should be on making the bathroom functional first. Then, you can start adding your personal touch with simple matching decor. After as time goes by, you can introduce small pieces to make the space feel like your own bathroom. Here are the essentials for now:

  • Bathroom cleaning supplies
  • Bath towels
  • Hand soap
  • Hand towels
  • Plunger
  • Small trash bags
  • Small trash bin
  • Shower curtain and hooks
  • Shower mat / Bath mat
  • Toothbrush holder
  • Toilet brush
  • Toilet paper
  • Toiletries
  • Weight Scale

First Aid and Wellness Essentials

Your first apartment isn’t complete without a well-stocked first aid and wellness kit. Accidents happen, and the last thing you want is to scramble for a band-aid or pain reliever when you need it most. Start with the basics (things like bandages) and then over time you add more specialized items. A compact first aid kit can help keep everything organized and easy to find. So here’s a list of essentials:

  • Antiseptic wipes
  • Band-aids (various sizes)
  • Cough drops
  • First aid kit
  • Hand sanitizer
  • Ice pack
  • Scissors
  • Pain relievers (e.g., ibuprofen, acetaminophen)
  • Thermometer
  • Tweezers
  • Vitamins and supplements

Cleaning Essentials

Cleaning supplies tend to hide away in closets and cabinets, making them easy to overlook… until you need them. But having the right supplies from day one will make your life so much easier, especially since moving can leave behind unexpected messes. 

Don’t forget about laundry essentials, too! A good detergent and a stain remover can be lifesavers. You might think you’re covered if you did laundry right before moving, but somehow that first pile of dirty clothes sneaks up faster than you’d expect. So, it’s important to be prepared.

Here are some cleaning basics to get you started on the right foot:

  • All-purpose cleaner
  • Basic home toolkit
  • Battery-powered drill
  • Bleach or whitener
  • Broom and dustpan
  • Bucket
  • Fabric softener sheets
  • Iron/handheld steamer
  • Ironing board
  • Laundry basket
  • Laundry detergent/pods
  • Large scrub brushes
  • Mop
  • Sewing kit
  • Stain remover
  • Toilet cleaner
  • Vacuum cleaner
  • Window cleaner

Other Home Essentials

What’s considered “essential” can vary from person to person, but there are a few items you’ll definitely want to grab before settling in your first apartment. These handy tools will help you navigate those little challenges that always pop up in the first couple of days. 

  • Flashlight (in case of power outage)
  • Screwdriver
  • Hammer
  • Step stool or ladder
  • Duct tape
  • Extension cords

Additional Tips for Your Own Apartment Checklist

Beyond these essential lists of essentials for your first apartment, here are a few extra tips to help you settle in smoothly and make the transition even easier.

Make Your Own List

We hope you found our list above useful. It’s not meant to stress you out, quite the opposite. You don’t need to buy everything at once. Think of it as a starting point to help you figure out what’s truly essential to you. 

Take a moment to go through the list, and cross off anything you know you won’t need. This will help you with decision making while shopping but will also keep you from spending on unnecessary things.

Learn How to Furnish an Apartment

Furnishing a brand new apartment can definitely feel overwhelming, but try to shift your perspective and approach it as an exciting journey rather than a chore. 

Instead of rushing through it or stressing about every little detail, embrace the process. Take time to enjoy each new item you bring into your space, and appreciate the fact that you’re creating a home that’s uniquely yours. 

If you’re unsure about your decor style, browse Pinterest or social media for inspiration. Do you gravitate toward a minimalist vibe, industrial, or bohemian style? Once you’ve chosen a direction, stick with it when buying furniture later on. This will keep your space cohesive, organized, and truly yours.

Shop Smart, Over Time

As we mentioned, no need to get stressed out. You don’t have to buy everything at once. Instead, spread out your purchases over time to save money. That’s really important for new homeowners. Also, keep an eye on good deals like garage sales or online marketplaces for hidden treasures. You’d be surprised at how much you can score. 

Rent a Storage Unit for Extra Items

As you get settled in, you might realize that not everything fits or is necessary right away. Renting a storage unit can be a great option for holding onto those extra items until you figure out where to put them. This gives you the flexibility to bring in only what you need now and keeps your apartment clutter-free as you adjust.

Final Thoughts

Moving into your first apartment is one of those major life milestones that makes you feel like you truly “made it.” While the excitement of creating your very own space is real, the reality of getting everything together can feel a little overwhelming. But don’t worry. With the right checklist in hand, you’ll be breezing through the process and turning your place into a cozy, functional home in no time. 

Start by focusing on the essentials. And remember that you don’t have to buy everything at the same time. Take it slow, enjoy every step, and let your space evolve over time. 

And if you feel like there’s too much stuff and not enough space, consider renting a storage unit. It’s a great way to adjust to your new home, giving you the freedom to store things while you figure out where everything should go.

We know this is an exciting (and sometimes stressful) time, and we’re here to help. 

My Storage Box offers secure, affordable storage with 24/7 access, video monitoring, and gated entry so you can focus on turning your apartment into a home without worrying about your stuff.

Ready to make the move? Call us at (580) 300-3006 or reserve your unit online today.

The My Storage Box Guide to Shipping Container Self Storage

Shipping Container Self Storage Solutions for Your Needs

Most of us don’t really give the composition of a storage unit much thought on a daily basis. It is a storage facility and that’s about it; it’s there for extra storage space, not for mulling over the materials and processes used in the process.

The self storage industry has exploded in recent years, and with demand comes a lot of new construction. Self storage facilities are made as fast and as cheap as possible, which isn’t altogether reassuring when you are putting your valuable stuff in self storage.

From our inception, My Storage Box has only used brand new shipping container self storage options, and we’re here to detail exactly why we do.

Benefits of Shipping Container Storage

When we set out to build a self storage business, we knew it had to be durable. After all, North-Central Oklahoma is home to some of the most volatile weather patterns in North America. Drastic weather calls for drastic measures, and we know that the typical storage unit construction isn’t the best option for harsh weather patterns.

Shipping containers are a great alternative to standard sheet metal construction storage units because their sizes are comparable but there is no comparison in terms of strength. 

A typical sheet metal structure like a storage shed or storage unit campus is made from 26- to 29-gauge sheet metal, shipping containers are made from thick, sturdy 14-gauge sheet metal.

  • They provide a secure and durable storage unit that can withstand harsh weather conditions and handling during transportation.
  • Shipping containers are easily transportable, facilitating relocation or deployment to different locations as needed.
  • They can be customized to meet specific storage needs, with add-ons such as shelves, climate control, roll-up doors, and personnel doors.
  • Shipping containers are a sustainable solution for storage, reducing waste and the need for new building materials.

Why My Storage Box is the right storage facility

What makes My Storage Box so great? Well, we are the only storage facility in town that uses super strong, sturdy shipping containers for our storage options. 

Everyone else has built the standard thin-skin setups that are built to save time and cut corners on cost. But we know the lay of the land; the weather is crazy here! When you are housing priceless heirloom furniture or better yet, a vintage classic motorcycle collection

How We Set Up Our Storage Containers

My Storage Box only buys brand new shipping containers for our storage facility. Whether it’s an 8×10, 8×20, or 8×40, each container was bought brand new. Does this matter?

Absolutely it matters. 

Shipping containers deal with the harshest environments on the planet. Salt spray, constant motion, extreme winds. You name it and it happens on the open ocean. 

If it is good enough to handle the worst that the Atlantic can throw at it, it is definitely good enough to sit on a gravel lot in Northern Oklahoma. Self storage facilities would do themselves a favor by using storage shipping containers, but we’re content to keep it our secret. 

All of our units are lined up on a level gravel pad in a secure storage facility. A traditional storage facility also has to worry about issues like drainage and flooding a lot more than we do. 

Our units are completely water tight and there aren’t many other self storage or temporary storage solutions that can make that claim. 

We we are purchasing shipping containers, we make sure we are only sourcing the very best and that the shipping container’s surface is appropriately thick and durable. Again, the sheet metal shipping containers require is roughly twice the thickness of a standard storage facility. 

How My Storage Box Implements Effective Storage Solutions

Our first concern in the storage business was making sure we had a secure place for you to keep all of your stuff. But not only secure, accessible. 

You are paying to store your stuff in our storage containers and we believe they should not only be totally secure, but you should be able to get into them whenever you want to, day or night. 

We make the renting process completely secure and easy, no need to come into the office. We only list storage units that are actually available, so if it isn’t on the website, it isn’t available. You simply select the unit you want to use and do the whole process online. 

Simple really is the name of the game. Shipping containers are a very simple way to store your household good. With double swing-out doors, it is easy to load and unload your unit, and you are the only person with keys to your padlock so you know nobody is creeping around in there without you knowing. 

The process is simple and effective. 

  1. Select the size you want and purchase access to that unit online. 
  2. We will issue you the unit and give you further instructions to access it. 
  3. Bring your stuff!

The storage units are all accessible 24/7/365 with your electronic gate access that we supply you, and you get access right away. Once you have your assigned unit, locking it is up to you. You provide the lock, you keep the keys. 

Secure Payment for Your Storage Needs

There is nothing more frustrating than trying to set up a service and finding out you have to go into the office to sign paperwork and make payments. We don’t see the point in this. Our payments are processed directly through the website. We have a portal for tenants so you can handle everything that has to do with your unit online. 

Afterall, why should you have to come into our office to set up your box if you work best after midnight? Keep bankers hours for banks. Set up storage online. 

Why Choose My Storage Box

Self storage facilities are the cheapest and fastest way to add storage space for your extra things, but not all self storage is made the same. My Storage Box uses shipping storage containers because we understand the harsh climate native to Northern Oklahoma. Our shipping containers are so much stronger than a typical rental storage space that it isn’t even in the same universe.

But it’s not just what we use; it’s how we use it. We set it all up online so you can worry about more pressing matters than getting off work early enough make it in to the office before they close. We handle the whole transaction online so you can get on with life.